To install a tilt TV wall mount, first, identify the location on the wall where you want to mount the TV. Then, use a stud finder to locate the studs in the wall.
Next, mark the location of the studs with a pencil. After that, attach the mounting plate to the back of the TV using the provided screws. Finally, align the mounting plate on the TV with the wall mount bracket and secure it in place using the included hardware and screws.
Now you can enjoy your TV mounted securely on the wall.

Credit: www.youtube.com
Choosing The Right Tilt Tv Wall Mount
Choosing the right tilt TV wall mount is essential for a seamless installation process. Learn how to install a tilt TV wall mount for the perfect viewing angle and enjoy your favorite shows and movies with ease.
Installing a tilt TV wall mount can be a game-changer for your home entertainment setup. Not only does it allow you to mount your TV securely on the wall, but it also gives you the flexibility to adjust the tilt angle for optimal viewing experience. However, with so many options available in the market, how do you choose the right tilt TV wall mount? Let’s explore two crucial factors to consider: your TV size and weight, and the right tilt angle.Consider Your Tv Size And Weight
When selecting a tilt TV wall mount, it is essential to consider the size and weight of your TV. The mount you choose should be compatible with the specifications of your TV to ensure a safe and secure installation. Here’s how you can determine the suitability of a mount for your TV:- Measure your TV: Start by measuring the screen size of your TV diagonally. This measurement will help you determine the appropriate mount size.
- Check the VESA pattern: The VESA pattern refers to the standardized mounting hole pattern on the back of your TV. Typically, it is represented by a four-digit number (e.g., 200×200). Make sure the mount you choose has a compatible VESA pattern for your TV.
- Consider the weight: Check the weight capacity of the mount and ensure it can support the weight of your TV. The weight capacity is usually mentioned in the product specifications.
Determine The Right Tilt Angle
The tilt angle of your TV wall mount plays a significant role in achieving the perfect viewing experience. Here’s how you can determine the right tilt angle for your TV:- Assess your room setup: Consider the location of your TV and the seating arrangement in your room. Determine the optimal height and viewing position for the best viewing comfort.
- Factor in eye level: The general rule of thumb is to set the tilt angle so that the TV is at eye level when you are seated. This ensures minimal strain on your neck and provides a comfortable viewing angle.
- Consider ambient lighting: If your room has bright ambient lighting, you may need to adjust the tilt angle to minimize glare on the screen. Experiment with different angles to find the best position that reduces reflections and enhances picture quality.
Preparing For Installation
Before you begin installing a tilt TV wall mount, it’s important to properly prepare. This involves gathering the necessary tools and equipment, checking wall compatibility, and determining wall stud locations. By taking these steps, you’ll ensure a smooth and successful installation process. Let’s dive into each of these preparation tasks in detail:
Gather The Necessary Tools And Equipment
Having the right tools and equipment is essential for a hassle-free installation. Before you start, make sure you have the following items:
- Tilt TV wall mount kit (includes brackets, hardware, and instructions)
- Tape measure
- Pencil
- Stud finder
- Electric drill
- Screwdriver
- Level
- Socket wrench
- Mounting template (if provided)
Check Wall Compatibility
Not all walls are suitable for a tilt TV wall mount, so it’s important to check the compatibility of your wall. Here’s what you need to consider:
- Wall material: Make sure your wall is made of solid material like concrete, brick, or wood. Avoid mounting the TV on plasterboard walls or hollow walls, as they may not provide sufficient support.
- Weight capacity: Check the weight capacity of your chosen tilt TV wall mount to ensure it can support your TV’s weight.
- Wall condition: Inspect the wall surface for any cracks, damage, or unevenness. It’s crucial to have a flat and stable surface for a secure installation.
Determine Wall Stud Locations
Locating the wall studs is crucial for a safe and secure installation. Follow these steps to find the stud locations:
- Use a stud finder to detect the presence of studs in the wall. Move the stud finder horizontally until it indicates the location of a stud. Repeat this process along the horizontal line where you plan to install the tilt TV wall mount.
- Mark the stud locations on the wall using a pencil. This will serve as a reference when installing the wall mount brackets.
By completing the necessary preparations, you are now ready to move on to the next step of the installation process. Having the right tools, ensuring wall compatibility, and locating wall studs will set you up for a successful installation of your tilt TV wall mount.
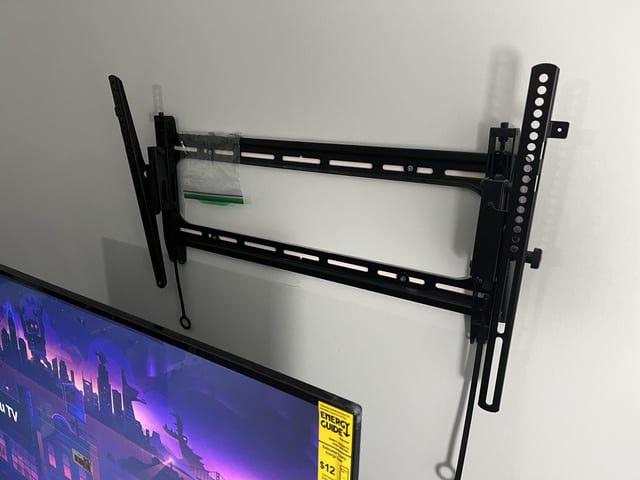
Mounting The Tilt Tv Wall Mount
Installing a tilt TV wall mount can be a simple and effective way to free up space in your home while creating a sleek and modern look. With a tilt TV wall mount, you can easily angle your television for optimal viewing, reducing glare and maximizing comfort.
Attach The Wall Plate
To begin mounting your tilt TV wall mount, start by attaching the wall plate to the wall. Before drilling any holes, make sure to check the wall for structural support and use a stud finder for added stability. Once you have determined the placement, mark the holes with a pencil and use a power drill to secure the wall plate into position. Make sure the wall plate is level and firmly attached for a secure mount.
Secure The Arm Bracket
Next, it’s time to secure the arm bracket to the back of your television. Carefully align the arm bracket with the mounting holes on the television and use the provided screws to secure it in place. Make sure the arm bracket is centered and level to ensure proper balance and stability.
Once the arm bracket is attached, determine the desired tilt angle for your television. Most tilt TV wall mounts offer adjustable angles to cater to your specific viewing preferences. Use the provided tools to adjust the tilt angle, ensuring a comfortable and enjoyable viewing experience.
Attach The Tv Brackets
Finally, it’s time to attach the TV brackets to the wall plate. Carefully position the TV brackets around the arm bracket, aligning them with the corresponding holes on the wall plate. Once aligned, use the provided screws and bolts to securely fasten the TV brackets to the wall plate. Ensure that all screws are tightened properly, creating a sturdy and reliable mount for your television.
Before finishing up, double-check that all connections are secure and that your television is properly aligned. Test the tilt functionality to confirm that your television moves smoothly and securely within the desired range. Once you’re satisfied with the installation, step back and admire your newly mounted tilt TV wall mount, ready to enhance your viewing experience.

Credit: www.amazon.com
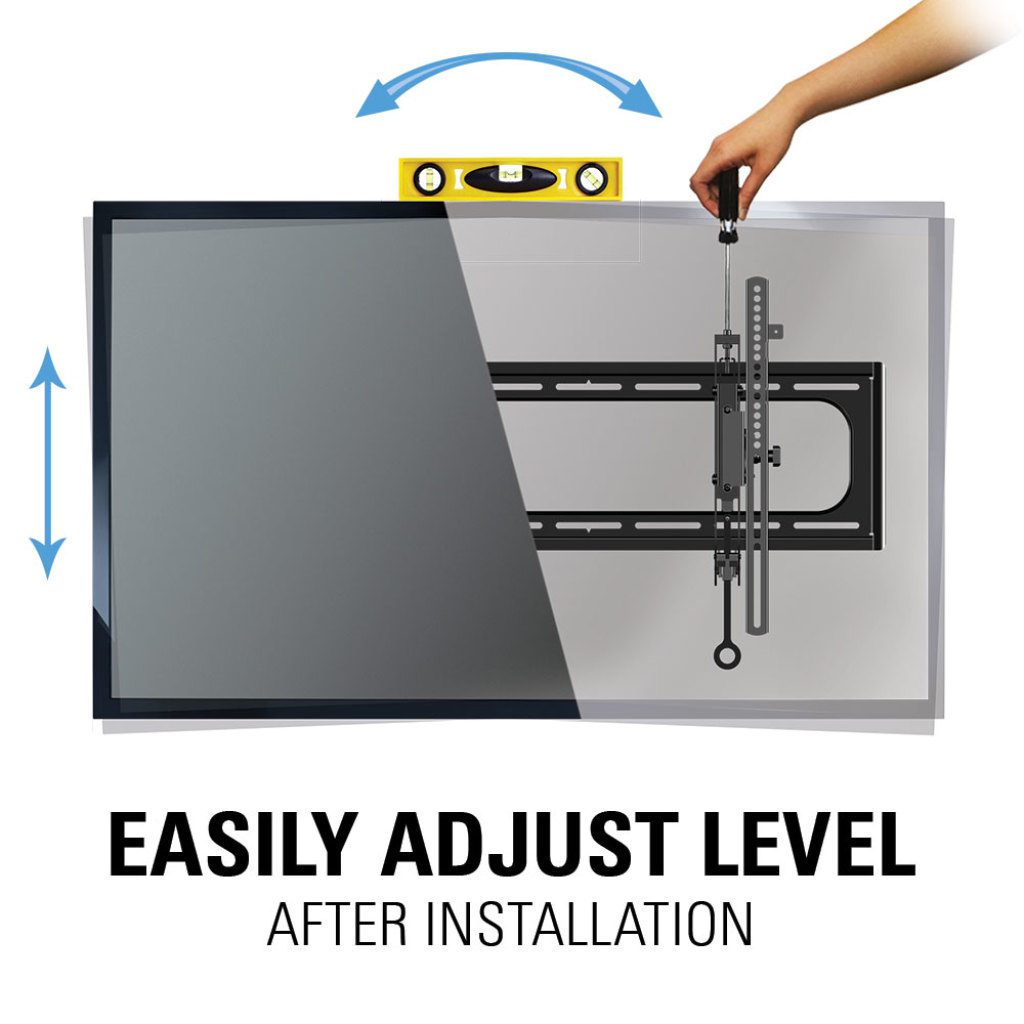
Adjusting And Testing The Tilt Angle
Adjusting and testing the tilt angle of your TV wall mount is a crucial step in the installation process. This ensures optimal viewing angles and a comfortable viewing experience for all. Follow these steps to achieve the perfect tilt angle for your TV.
Set The Desired Tilt Angle
To achieve the perfect viewing experience, it is crucial to set the tilt angle of your TV wall mount to match your preferences. Follow these simple steps to set the desired tilt angle:
- Start by loosening the tilt adjustment bolts or screws located on the side or bottom of the wall mount bracket using a screwdriver or Allen wrench.
- Gently adjust the tilt angle by tilting the TV up or down to your liking.
- Once you have set the desired tilt angle, tighten the adjustment bolts or screws to secure the position. Ensure they are tight enough, but be careful not to overtighten, as it may strip the threads.
- Double-check the tilt angle by visually inspecting it from various angles. Make any necessary adjustments until you are satisfied with the level of tilt.
Test The Tilt Mechanism
After setting the desired tilt angle, it’s important to ensure the tilt mechanism functions smoothly and securely. Follow these steps to test the tilt mechanism:
- Gently push the TV upward to check if it tilts upward smoothly.
- Next, apply gentle pressure downwards to test if the TV tilts downward effortlessly.
- If the tilt mechanism does not move smoothly or feels stiff, try adjusting the tilt angle slightly to see if it improves the movement. If the issue persists, consult the manufacturer’s instructions or contact customer support.
- Verify if the TV securely holds its tilt position. Apply slight pressure in different directions to ensure it remains in place without any unintended movement.
- Lastly, test the TV’s tilt angle by viewing it from your intended seating positions. Confirm that the angle allows for comfortable and unobstructed viewing.
Finalizing The Installation
Once you have successfully followed the steps to install a tilt TV wall mount, there are a couple of important tasks that need to be completed to ensure the finalization of the installation. These tasks include hiding the cables and wires and verifying the stability and security of the mounted TV.
Hide Cables And Wires
One of the essential steps in finalizing the installation of a tilt TV wall mount is hiding the cables and wires. Exposed cables can not only ruin the aesthetic appeal of your TV setup but also pose a safety hazard. To neatly conceal the cables and wires:
- Start by identifying the location where you want the cables to exit.
- Use a cable management kit or wire raceway to neatly organize and hide the cables along the wall.
- If necessary, drill holes in the wall to route the cables behind the drywall for a cleaner look.
- Ensure that the cables are securely tucked in and do not interfere with the tilt or movement of the TV mount.
By following these steps, you can ensure that your TV setup looks neat and professional, with no visible cables or wires to distract from your viewing experience.
Verify Stability And Security
Before you can fully enjoy your newly mounted TV, it’s crucial to verify its stability and security. This step ensures that your TV is safely secured to the wall mount and minimizes the risk of any accidents or damage. Here are the key aspects to check:
- Make sure that the TV is securely attached to the wall mount bracket.
- Ensure that the wall mount itself is securely fixed to the wall, following the manufacturer’s instructions.
- Test the stability of the TV by gently pushing and pulling it in different directions to ensure it remains firmly in place.
- Double-check that all screws and bolts are tightened properly to maintain the stability and security of the TV mount.
By taking the time to verify the stability and security of the TV mount, you can have peace of mind knowing that your TV is safely mounted and ready for optimal viewing.

Credit: www.amazon.com
Frequently Asked Questions On How To Install A Tilt Tv Wall Mount
Should You Tilt A Wall Mounted Tv?
No, you should not tilt a wall mounted TV. Tilt adjustment is not recommended as it may affect the optimal viewing experience and potentially damage the TV. It is best to mount the TV at eye level for comfortable and proper viewing.
What Height Should A Tilt Tv Be Mounted To?
Mounting the tilt TV at the correct height is important for optimal viewing. Generally, the TV should be mounted at eye level when sitting, providing a comfortable viewing experience. The recommended height is around 42 to 50 inches from the floor to the center of the TV screen.
Can You Put A Tv Mount On A Slanted Wall?
Yes, you can mount a TV on a slanted wall. Make sure to use a TV mount that is specifically designed for slanted walls. Also, ensure that the mount is securely anchored to the studs in the wall to provide stability and support for the TV.
What Is The Difference Between Tilt And Non Tilt Tv Mounts?
Tilt TV mounts allow you to adjust the angle of your TV screen, offering better viewing angles. Non-tilt mounts keep your TV fixed in one position. Choose a tilt mount for flexible viewing or a non-tilt mount for a stable display.
Conclusion
Installing a tilt TV wall mount is a practical solution for maximizing your viewing experience. By following these step-by-step instructions, you can easily mount your television securely and enjoy the perfect angle. Remember to gather all the necessary tools, measure carefully, and ensure proper installation for a safe and stable set-up.
With a tilt TV wall mount, you can transform your space and elevate your entertainment. So, go ahead and take your home theater to new heights!
- Unleash the Potential: Exploring the World of Ceiling TV Mounts - February 15, 2024
- How to Mount a Tv on a Swivel Stand - February 15, 2024
- How to Hang Tv Outside - February 14, 2024